A week ago I’m working on a project in my office. Suddenly my boss came and told me – “Souvik, we need these parts in ABS. 10 unit required by next week”. I took it so lightly I sliced the parts in Cura and load it in printer and press the print button. and i introduced to the ABS printing problems.
From here everything gone wrong. Not even 5 minutes passed I checked, the part already came off from print bed. I tried 5 time more without changing anything, every time same result. Then I start searching online for the fix and even asked AI. Tried all but nothing seems to work for me. After wasting two days I decided to came up with my own solution.
And finally it worked, I 3d printed my first part with ABS. So here in this post I discussed all problem i faces and how I came up with the solution, all in details. Here is the RenderWrench guide for ABS 3d—printing. So, let’s start with the main topic of the blog.
Why ABS is Hard to print
ABS is very common material that used by 3d printing community for very long time. But the challenges comes with ABS are real. Most common challenges with ABS are like-
- Warping – ABS is very prone to warping. You will see this at base layer and narrow part of the print, if you try to Print ABS without any precaution.
- Shrinkage – While 3D printing if you don’t control the ambient temperature of printed part. That’s may some time annoying when the part is subjected to assembly.
- Temperature sensitivity – ABS is quite sensitive to the changing temperature. Even temperature change in day and night can effect the ABS printing. That why its important to keep the printer enclosed.
Lets start with My Printing setup..
My printing SETUP
I am using a Creality ender 3 s1 pro. It doesn’t come with a stock enclosure. But it’s a pretty decent 3D printer. For this specific print I a used white ABS filament. The spool was in brand new condition.
I also used stock nozzle that comes with the printer. 0.4 mm brass nozzle.
Print bed is also stock too. But I used ABS slurry to improve Bed adhesion. Bed temperature is around 110 to 120 degree Celsius.
I made the Enclosure for the printer from scratch. Its completely DIY. We will discuss in details letter in this blog.

Slicer I used is Ultimaker Cura. In my opinion this one of best beginner friendly Slicer you can get (not sponsored). It’s Advance settings gives you decent control over the 3d print setting. Its important, because you need to tweak some setting to print with ABS.
Here is the quick recap for the above section.
- Printer I used.
- Filament (ABS)
- Nozzle
- Bed temperature
- Enclosure
- Slicer settings
Problem I faced While Printing ABS
On first attempt without any preparation started the printing. And as expected it came off from the Print bed. On second attempt I tried increasing temperature. It came off again but it took little more time.
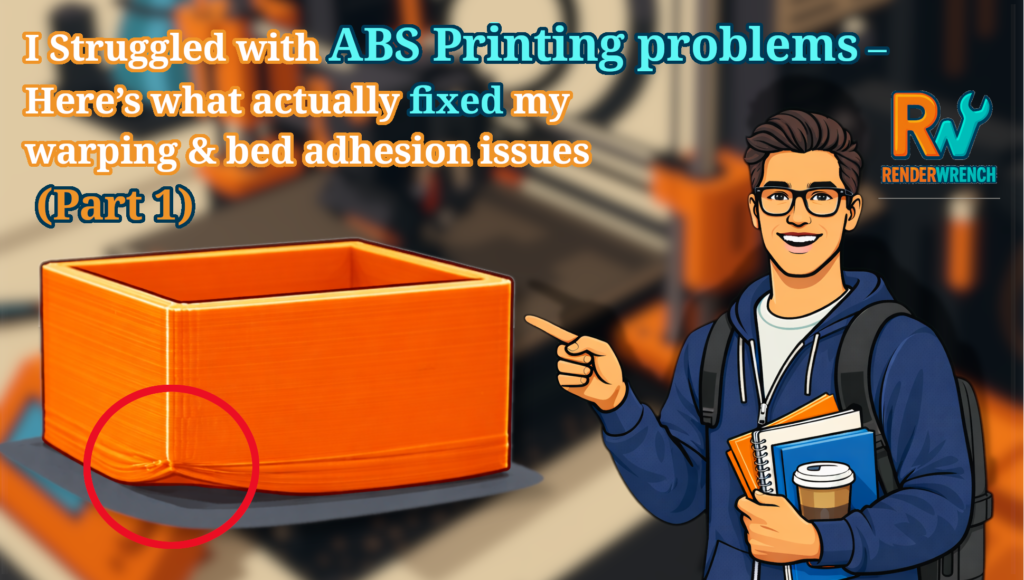
The main problem I observed bending of first layer. First one side of the print slightly came off then the print base came off completely.
Second think I noticed bed adhesion is very low. Some time print is just slides off it’s place. It just don’t want to stick with anything.
If some how bed adhesion managed, if the ambient temperature is not controlled print part come off due to shrinkage causing contraction.
Problem 1: Parts Lifting Off the Bed (Early & Mid-Print)
- On my first attempt, I started printing without any special preparation.
- As expected, the print lifted off the bed within minutes.
- On the second attempt, I increased the printing temperature.
- The print still failed — it stayed longer this time, but eventually came off again.
🔍 Observation:
Increasing nozzle temperature alone did not solve the problem. It only delayed the failure.
Problem 2: First Layer Bending and Edge Curling
- The most consistent issue I observed was bending of the first layer.
- One side of the print would slightly lift first.
- Once that edge lifted, the entire base of the print eventually detached from the bed.
🔍 Observation:
The failure always started at the edges, not the center — a clear sign of warping.
Problem 3: Extremely Poor Bed Adhesion
- Bed adhesion was very unreliable.
- Sometimes the print would simply slide out of position instead of sticking.
- No matter what surface or basic setting I tried, the part refused to stay fixed.
🔍 Observation:
Without strong initial adhesion, ABS prints have no chance of surviving longer prints.
Problem 4: Uncontrolled Ambient Temperature & Shrinkage
- Even when bed adhesion was temporarily managed, prints failed later in the process.
- If the surrounding temperature was not controlled, the printed part shrank as it cooled.
- This shrinkage created internal stress, pulling the part off the bed.
🔍 Observation:
ABS shrinkage combined with temperature fluctuations caused continuous contraction, leading to warping and detachment.
🧠 Key Realisation
At this point, it became clear that ABS printing is not just about nozzle and bed temperature.
The real issue was thermal stability — bed adhesion, ambient temperature, and material behavior were all connected.
This realization is what led me to rethink my entire ABS printing setup.
I was honestly close to giving up on ABS printing altogether.
But one final approach changed everything. In Part 2, I’ll share the real fixes that saved my ABS prints — no theory, just what worked.
Follow RenderWrench on Instagram


Pingback: Struggled with ABS Printing Problems — Here’s What Actually Fixed My Warping & Bed Adhesion Issues (Part 2) - RenderWrench